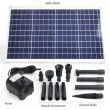
Buy a Solar Cascade Pump Max Head 3.5 m to pump water through tubing and create a stunning waterfall for medium to larger ponds and garden features. Enjoy the best prices, great reviews, and free UK delivery.
How Can I Create Stunning Waterfalls While Enhancing Pond Health?
The Solar Cascade Pump Max Head 3.5m is the perfect solution for creating beautiful cascading waterfall effects while improving water quality through circulation and oxygenation. Designed for versatility, it works seamlessly with medium to large ponds for various water features.
Why Cascading Waterfalls Are Perfect
Cascading effects not only enhance the aesthetic appeal of your pond but also improve water quality by promoting oxygenation and preventing stagnation. This is particularly beneficial for aquatic life and overall pond health.
How to Use the Pump for Cascade Effects
Attachments: Use compatible tubing (19 mm) to fit the pump and direct water flow.
Placement: Position the pump in a location where it can efficiently push water through the tubing.
Outlet Design: The pump outlet provides a steady and powerful flow for your chosen feature.
Customization: Adjust the flow rate to suit your desired water feature effect.
Additional Features to Enhance Your Pond
Perfect for jet sprays, cascades, spitters, and general water circulation.
Optional battery system ensures consistent operation during cloudy days.
Note: This solar pump is a versatile, eco-friendly solution that enhances both the beauty and health of your outdoor water features.
Powerful 1800 LPH Multi Use Solar Pump
The Solar Cascade Pump Max Head 3.5 is a premium panel-to-pump kit designed for various water features. It excels in powering jet sprays, cascades, and general water circulation.
Key features:
High-volume water circulation for medium to large ponds
Max head height of 3.5m for stunning cascading waterfalls
Adjustable flow control for flexible water feature customization
Dry run protection to prevent pump damage
Solar-powered operation with a 40W monocrystalline solar panel
Unparalleled Features and Benefits
High-Performance Solar Technology
Powered by a 40W monocrystalline solar panel for efficient energy conversion.
Eco-friendly operation with no reliance on mains electricity.
Max operating voltage: 18.36V (dependent on sunlight conditions).
Exceptional Power and Reach
Maximum flow rate of 1800 LPH (liters per hour), ideal for medium to large ponds.
Maximum lift height: 3.5 meters (11.5 feet), great for waterfalls and cascades.
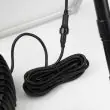
5-meter cable length for flexible solar panel placement.
Durable and Versatile Design
Dry run protection ensures pump safety during low water levels.
Compatible with 19 mm tubing for various installations.
Compact pump size: 130mm x 85mm x 91mm, ensuring easy installation.
Litres per Hour - Performance at Various Pumping Heights
Without Battery Backup
Height
Flow Rate
@0m
1800 LPH
@0.5m
1500 LPH
@1.5m
1000 LPH
@2.0m
700 LPH
@2.5m
450 LPH
@3.0m
200 LPH
Max. height
3.5M
With Battery Backup
Height
Flow Rate
@0m
1400 LPH
@0.5m
1200 LPH
@1.5m
700 LPH
@2.0m
400 LPH
Max. height
2.0M
See It In Action
Optional Battery System (Recommended)
For consistent operation during cloudy weather or at night, consider the optional battery backup system. It ensures uninterrupted performance and stable water flow.
Extended operation during low sunlight
Prevents start-stop operation in variable sunlight
Enhances fountain and waterfall displays
The PowerBee Advantage
With over 16 years of solar power expertise, PowerBee delivers premium products crafted with care. Enjoy free UK delivery, a 30-day money-back guarantee, and exceptional customer support.
Eco-friendly operation powered by renewable solar energy.
Cost-effective with no ongoing electricity costs.
Trusted quality backed by a 2-year guarantee.
Transform your pond with stunning water features backed by reliable solar power.
Rate this product
0/5
0 Reviews
Please rate this product, describe its advantages and disadvantages, please share your impression about its use
Professional Installation Guide - Solar Pump System
Our solar pump systems are designed for efficient, year-round operation, but their performance is optimized for the sunnier months of spring and summer. Proper installation, seasonal adjustments, and maintenance are essential for optimal performance and longevity of your system. Follow this detailed guide to set up and maintain your solar pump system effectively.
Quick Installation Summary
Step 1: Place the pump in the water and make it stable.
Step 2: Connect the pump to the battery box.
Step 3: Attach the battery box to the solar panel.
Step 4: Position the solar panel in direct sunlight.
Step 5: Choose a spray head, turn it on, and enjoy!
1. Pre-Installation
Component Verification
Before beginning installation, carefully inspect and verify that all components are present and in good condition:
Solar Panel: Ensure there are no cracks or damage to the panel surface.
Pump Unit: Verify the pump is undamaged and operational.
Connecting Cables: Check for frayed or loose wires.
Mounting Hardware: Ensure all screws, brackets, and mounts are included.
Battery Box: Confirm battery box is intact and dry.
Tip: Inspect all components for possible transit damage before starting installation.
Site Assessment
Conduct a thorough site survey to identify the best installation setup:
Choose a location for the solar panel with full sun exposure and minimal shading throughout the day.
Calculate the total head height (vertical distance the water must be pumped) and distance from the water source.
Ensure accessibility to the equipment for regular maintenance and adjustments.
Identify safe, dry location for battery box placement above water level.
Tip: Avoid locations with nearby trees, buildings, or other structures that might shade the solar panel.
Safety Requirements
Critical Safety Guidelines:
Never place battery box in water or pond
Battery box must remain in upright position only
Ensure proper ventilation around battery box
Avoid areas prone to flooding
Keep battery box free from coverings
Maintain proper drip loops in all cables
2. Primary Installation
Solar Panel Installation
Proper placement and alignment of the solar panel are critical for performance. Follow these steps:
Securely mount the solar panel using the provided hardware.
Position the panel facing south (or as close to south as possible) for maximum sunlight exposure.
Adjust the tilt angle of the panel seasonally based on the sun's position in the UK for optimal performance:
Winter (Nov-Feb): Steep angle of approximately 60° for the low sun.
Spring/Autumn (Mar-Apr, Sep-Oct): Intermediate angle of around 40°.
Summer (May-Aug): Shallow angle of around 20-30° for the high sun.
Ensure all mounting points are secure and stable.
Pump System Setup
Choose the appropriate outlet fitting to match your tubing requirements.
Place the pump higher in the pond for better performance.
Avoid placing the pump at the bottom of the pond to prevent clogging.
Use a platform or floating device to elevate the pump.
Upturned flower pots or similar items can act as effective platforms.
Installing the pump higher improves water flow and energy efficiency.
Secure all connections to avoid leaks.
Place the pump on a stable surface or use weights to keep it secure in the water.
Battery Box Installation
Install on flat, stable surface only
Maintain upright position on its feet
If mounting on wall/fence:
Use appropriate mounting brackets
Ensure structure can support weight
Maintain proper ventilation space
Keep away from water sources and flood-prone areas
Cable Management
Create proper drip loops in all cables to prevent water tracking
When battery box is mounted below solar panel:
Form U-shaped drip loop in cables
Secure cables properly to prevent strain
Ensure all connections are properly tightened
Use appropriate weatherproof cable housing
System Integration
Connect the pump to the solar panel using the provided cables.
Ensure watertight connections at all junction points to prevent electrical issues.
Verify correct polarity (positive to positive, negative to negative) and connection integrity to avoid malfunctions.
3. System Optimization
Performance Testing
Test the system under full sunlight to check the flow rate and maximum head height.
Observe performance during varying sunlight conditions to ensure the system operates as expected.
Check for leaks in tubing and connections during operation.
Seasonal Adjustments
Adjust the solar panel angle seasonally to maintain optimal alignment with the sun.
Fine-tune the pump placement to meet specific water flow requirements.
Monitor the flow rate and adjust as needed for seasonal or environmental changes.
4. Seasonal Maintenance Advice
Winter Considerations
Solar pumps are designed for spring and summer use. While they can work during winter, performance will be limited due to reduced sunlight. Here are some winter-specific tips:
If your unit has a battery backup, fully charge the battery and store it indoors to protect it from freezing temperatures.
Remove the pump from the water if freezing is expected, as ice can damage the pump.
Store the pump and other components in a dry, safe place when not in use.
Regular Maintenance
Clean the solar panels quarterly to ensure maximum energy generation.
Inspect the pump system monthly for wear, tear, or blockages.
Clean the filtration system regularly to maintain water flow and prevent clogs.
Check all electrical connections periodically to ensure they remain secure and watertight.
Verify battery box remains dry and properly ventilated.
This guide provides general installation instructions. For specific applications, consult with your technical team or refer to the detailed manual provided with your system.
Discover the operational principles and seasonal performance of your solar-powered pump system. Designed to provide reliable and eco-friendly water management, this guide explains how to maximize its potential.
1. Basic Operating Principle
Direct Solar Conversion
The solar panel captures sunlight and converts it into electrical energy.
Power is transmitted directly to the high-capacity pump.
The pump activates and moves water when sufficient solar power is available.
Performance varies directly with available sunlight.
2. Seasonal Operation
Peak Season (May to September)
Maximum performance during direct sunlight.
Optimal operational hours: 9am to 6pm (varies by month).
Consistent performance during clear weather.
Shoulder Seasons (March-April, October)
Reduced operational hours due to shorter daylight.
Performance varies with sun intensity.
Expect 40-60% of peak season performance.
Winter Operation (November-February)
Significantly reduced performance due to lower sunlight intensity.
Limited operational hours: typically 10am to 3pm on clear days.
Expect 20-30% of peak season performance.
3. Optimizing Performance
Seasonal Solar Panel Positioning
To maximize energy capture, adjust the solar panel angle based on the sun’s position throughout the year. In the UK:
Winter (November-February): Position the panel at a steeper angle, approximately 60°, to capture the lower sun (around 15-20° above the horizon).
Spring/Autumn (March-April, September-October): Adjust the panel to an intermediate angle of approximately 40°.
Summer (May-August): Set the panel at a shallower angle, roughly 20-30°, as the sun is higher in the sky (up to 60° above the horizon).
Repositioning the panel seasonally will significantly improve performance and energy capture.
General Installation Tips
Ensure the solar panel is facing south (or as close to south as possible) for maximum sunlight exposure.
Make sure there is no shading of the solar panel throughout the day, as even small shadows can reduce efficiency.
Regularly clean the solar panel to remove dust, dirt, or debris that may block sunlight.
Planning Considerations
Account for the head height of the pump when planning your installation. Higher head heights reduce flow rate.
Adjust your expectations based on seasonal sunlight availability. Lower sunlight intensity in winter may affect performance.
4. Optional Battery Backup
Battery Backup Availability
Some solar-powered pumps include a built-in battery backup, while for others, it is available as an optional add-on. Check your pump specifications to confirm if battery backup is included, optional, or not available.
Benefits of Battery Backup
Ensures more consistent operation during variable sunlight conditions.
Allows operation during the evening or after sundown.
Extends runtime, making it ideal for critical applications or decorative features.
Performance Adjustments with Battery Use
Flow rate is typically reduced by approximately 40% during battery operation.
Maximum head height is also reduced proportionally by around 40%.
Battery systems may not include additional accessories like LED light rings unless specified.
5. Technical Support
Need Assistance?
For detailed technical queries or custom installation advice, contact our specialist team at: